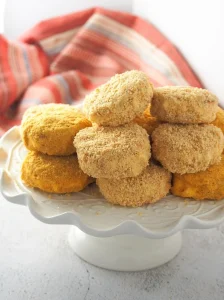
Silvanas with meringue wafers, French buttercream filling, and ground cashew or cracker crumb coating are the ultimate cookies! Creamy and buttery, they’re seriously addicting!

Hello, again! I am Sanna, and I am back with another delicious dessert recipe for you. Remember the Sans Rival cake I shared a few days? Well, these Silvanas are like its baby cousins, a miniature version of the cake with no rival.
The ingredients and procedure are almost identical, but instead of one elegant round cake, we’re baking things up in cookie form. You get all the flavors and textures you love in a fun and portable size!
Silvanas are a personal favorite of mine, and I can seriously devour a dozen of these frozen treats in one sitting. I fondly remember walking the malls back in the day when I was a college student; I would spend the afternoon staring at the lovely sylvanas showcased behind the glass shelves of a confectionary shop and wishing I had enough allowance to afford them.
It’d be a lucky day if I were able to buy one, but then, the sweetest revenge happened. I became a baking nerd, and now I can make them any time, and how many I want. Which is often, and a lot.
What are Silvanas
Like Sans Rival, Silvanas or sylvanas are based on the French Dacquoise dessert cake. The meringue wafers are filled with French buttercream to form a sandwich cookie, and then coated with more buttercream and rolled in ground cashews or cracker crumbs to add extra flavor and crunch.
Due to the use of buttercream, these Filipino treats are served frozen for best texture.
How to Make Sylvanas
Making the Meringue Cookie Wafers
- To ensure even sizes, use the rim of a glass or a cookie cutter with 2.5 inches diameter to trace circles on the parchment paper. Line baking sheet with the stenciled paper and set aside.
- Combine the flour and 1 cup of the cashews in a food processor and process together into fine crumbs. Set aside.
- Make sure the bowls, beaters, and utensils used are very clean and free of yolk or fat particle which can interfere with proper whipping. Yolks and whites are easy to separate when the eggs are cold but bring the egg whites to room temperature for 30 minutes before beating to ensure volume.
- In a bowl of a stand mixer, beat egg whites on medium-high speed until frothy. Sprinkle in cream of tartar and continue to beat until soft peaks form.
- With the mixer running continuously, gradually add the sugar. Continue to beat until the egg whites form stiff peaks. To test, tip the bowl, and if the meringue doesn’t slide off, it’s ready.
- Add the vanilla extract and about ⅓ of the flour/cashew mixture. Gently fold them into the meringue using a rubber spatula, making sure not to deflate the whipped egg whites. Fold the rest of the flour/cashew mixture in two more additions.
- Transfer the meringue in a large piping bag fitted with a large piping tip.
- Using the template as a guide, pipe the meringue on the prepared baking sheet at about ½ inch in height.
- Using a knife or an offset spatula, flatten and smoothen the tops of the meringue circles. Gently tap the baking sheet on the counter to remove any bubbles.
- Bake in a 325 F for 17-20 minutes or until lightly browned.
- Using a spatula, transfer the cookie wafers to a cooling rack. The edges will be crisp and the middles soft.
- Allow to completely cool while making the buttercream.
Making the French Buttercream Filling
As for filling and outside icing, Silvanas use French buttercream which is made of whipped egg yolks, cooked sugar syrup, and softened butter. It involves a bit more work to make than regular frosting, but it does give the cookies their signature decadence.
- In a medium saucepan, stir together the sugar and water. Let the mixture boil over medium heat. Once boiling, place a candy thermometer in the pan to monitor the temperature. It should reach 238 F before adding it in a thin stream to the beaten egg yolks.
- Meanwhile, start to beat the egg yolks on a stand mixer on high speed until they start to thicken and become pale in color.
- Continue to beat while the sugar/ water mixture cooks in the pan. Once the temperature of the mixture reaches 238 F, turn the heat off and slowly pour the sugar syrup in a thin, continuous stream into the yolks with the mixer still running.
- Continue beating the yolks until the mixing bowl is cool to the touch.
- With the mixer still running, add the softened butter, about a tablespoon at a time. Beat until a fluffy buttercream forms. Make sure to take the butter out of the fridge about 2-3 hours ahead to bring to room temperature. It should be soft but not melting or it will make the buttercream grainy.
- If you like to add flavor, add a few drops of extracts such as ube, langka or pandan to the buttercream and refrigerate for a few minutes. Whip it again for easier spreading.
- Spread the buttercream minimally. The amount of buttercream in the recipe is enough to fill and coat 13 cookie sandwiches.
Assembling the cookies
Here is the most fun part: putting the Sylvanas cookies together!
- Pair cookies that are similar in sizes and shapes. Take one cookie and spread a thin layer of buttercream on the rough side ( that is the side of the cookie that was facing up during baking). Place another cookie with the rough side facing inwards as well, on the buttercream to make a cookie sandwich.
- With a spatula, cover the sides and base of the cookies with a layer of buttercream. Smooth out edges using the spatula.
- On a shallow plate, carefully roll the cookie sandwich in ground cashews until fully coated. Repeat with half of the cookies.
- Roll the remaining cookies in graham cracker crumbs. If you like to add vibrant colors and various flavors, place the graham cracker crumbs in a ziplock bag and add a few drops of flavor extracts. Shake and work the bag with your hands to evenly tint the crumbs.
- We’re using ground cashews and graham cracker crumbs as coating, but feel to try vanilla cake, mamon tostado or Oreo cookies. Just process in a food processor until it resembles fine crumbs.
- Arrange the assembled silvanas on a parchment-lined baking sheet, cover, and freeze for about 1 to 2 hours or until firm.
- To lock in flavor and texture, transfer to an airtight container and keep frozen until ready to serve.
Whew! All this writing makes me crave these sylvanas again. I can still taste the nutty, creamy and sweet flavor of the cookies in my mouth!
I hope you try these special Filipino cookies and find the tips above helpful in making them at home. The process is pretty elaborate, but I promise each buttery piece is worth the work. In fact, I am getting ready to make another batch to enjoy; I just can’t get enough!
That’s it for now. I will back here on Kawaling Pinoy with my take on Red Ribbon’s black forest swiss cake roll, so please stay tuned. You can check more of my recipes below, and of course, my blog, Woman Scribbles, for more baking inspirations. Till next time!
More Baked Goods Recipes:
- Sweet Potato Dinner Rolls
- Crema de Fruta (from scratch!)
- Corned Beef Pandesal


